


|
Note from Editor: Project designer Howard Lamey has begun a groundbreaking series of vintage-style cardboard structure projects just for Halloween. After he made a great train station, I suggested a water tower as a followup, and this is what he put together.
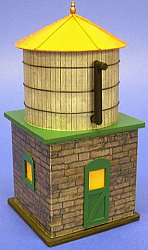
Building Spook Hill™ Water Tower
 The Spook Hill™ Water Tower project complements the unique and charming Spook Hill™ Station. Depending on your color choices, it would look good with any holiday village or O scale train, including: The Spook Hill™ Water Tower project complements the unique and charming Spook Hill™ Station. Depending on your color choices, it would look good with any holiday village or O scale train, including:
It's also the easiest Spook Hill™ structure to build so far, so it would be a good project to get the kids involved with.
Some of the construction is very similar to building a glitterhouse, (the traditional pastboard houses that became popular in the early-to-mid 1900s) so we will refer to articles on glitterhouses in general from time to time.
A note about stone versus timber water towers: When I asked Howard to consider designing a water tower for the Spook Hill™ station, his first design had timber supports, the kind you usually see on model railroads and old photos. But many small railroads of the 1800s and early 1900s supported their water tanks on brick or stone bases. The door represents the entry to the pumping machinery, which is hidden inside. This makes construction of this project a "breeze" compared to building a "timber" structure to support it. By increasing the size of this project by say 2 1/2 times, you can make a nice Large Scale version that would look good with LGB or AristoCraft trains (if you're running them indoors, that is).
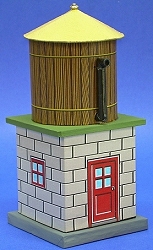 Update for 2009 - Tribute to Tinplate Version! - Since Paul and I designed this structure for his Spook Hill™ Halloween village and railroad, we have started a series of cardboard structures that pay Tribute to Tinplate - easy and inexpensive replicas of the great lithographed tinplate railroad structures of the early 1900s. When I mentioned I was thinking about a water tower for our "tin city," Paul sent me new graphics that I used to make a version that looked like it belonged on an early toy train railroad. He has now included those graphics in our web sites so you can follow these instructions and make a tinplate-inspired version for your railroad, too. Update for 2009 - Tribute to Tinplate Version! - Since Paul and I designed this structure for his Spook Hill™ Halloween village and railroad, we have started a series of cardboard structures that pay Tribute to Tinplate - easy and inexpensive replicas of the great lithographed tinplate railroad structures of the early 1900s. When I mentioned I was thinking about a water tower for our "tin city," Paul sent me new graphics that I used to make a version that looked like it belonged on an early toy train railroad. He has now included those graphics in our web sites so you can follow these instructions and make a tinplate-inspired version for your railroad, too.
What You Will Need
Clean cardboard (used is fine). This includes cereal boxes, the backs of writing tablets, corrugated box panels, anything flat, firm and clean, that you can save. For the bases on this project, I used heavy chipboard, that is - thick, but solid cardboard like that on the back of writing tablets. If you don't have that, you could alway build those bases out of fine corrugated cardboard and wrap them, the way we wrap bases in our Building Glitterhouse Bases article, but don't make them as thick as traditional glitterhouse bases.
In addition, for this project you'll need:
- A sharp mat knife or Xacto knife
- Elmer's white Glue-All. A glue stick would also come in handy.
- Clear glitter (optional)
- Several sheets of acid-free white bond paper
- Acrylic craft paint for the door frames, window frames, bases, and trim.
- A cheap craft paint brush to cut apart and reglue for the spout.
- Access to the Internet and a color printer.
- Yellow vellum, celophane, or similar translucent medium. I used a piece of flourescent yellow paper from the scrapbooking section of a craft store. It is so bright that the windows look like they are lit even when they're not.
- Brown florist wire to use as the "bands" that hold the tank together. Alternatively, you could just cut thin strips of dark brown paper and glue them on.
- A tube or can in the diameter you want (in this case we show 2 1/2 inches in diameter). It should be at least as wide as it is tall (preferably wider).
For a more comprehensive list of tools and supplies that come in handy on any cardboard house project, please refer to our article What You Need to Build Glitterhouses.
Print The Patterns
This project has two structure patterns that you will need to cut out and transfer to cardboard, as well as three texture sheets that you will use to finish your station's appearance.
You may print the structure patterns on any sort of paper, since you're simply using this to help you cut out your cardboard media.
Printing the Plans - We've provided a full-sized PDF version of each plan sheet to help you print the plans at the size you need. You will need Adobe Acrobat Reader on your computer. Click on each plan drawing above to open the PDF version. Select the print option, tell it to "auto rotate and center." Don't select the "scale to page" or "shrink to fit" option. Print.
If for some reason this doesn't work, contact
Paul and ask him for help - that's his department. :-)
Printing the Patterned Paper - The patterns used on this project are from the Big Indoor Trains™Building Texture pages. If you would like to try a different pattern, please check them out. In the meantime, the following patterns will give you the same graphics used in this project. Print each on acid-free bond paper at the highest quality setting your printer allows.
Note: Most of the graphics printouts on this project were actually printed on an acid-free light card stock. This made the graphic sheets a little harder to fold cleanly but gave a sturdier overall effect.
For a realistic or Halloween finish, consider using the following graphics.
| 
| 
|
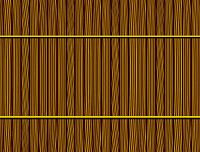
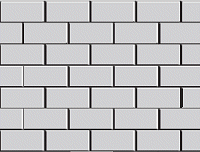
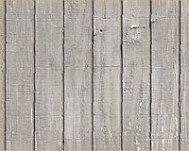
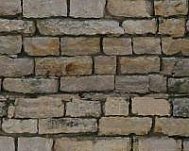
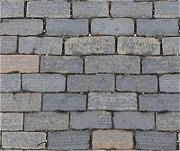
| T111 Siding Pattern for water tank | Stacked Stone Siding Pattern as shown in photos | Hocking Valley Pavers Siding Pattern (alternate) |
Note: If you are interested in building for larger scales, you will find larger versions of the same brick, stone, and wood patterns at the Family Garden Trains™Building Textures page.
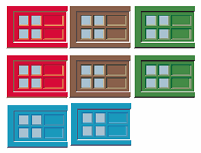
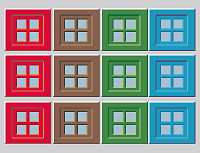
For a tinplate, vintage appearance, consider substituting the following graphics. The S scale versions will work with the plans in this article. If you are building a larger water tank, though, you may wish to download the O scale versions. (If you want graphics that are appropriate for Standard Gauge or Large Scale, please contact
us - some of the files are too large to store on the site indefinitely.)
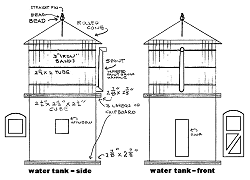
 Establishing the Tank Size Establishing the Tank Size
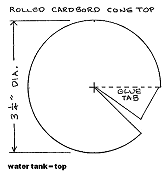
The final size of this project will depend in part on the size of the tube you use for a tank. I used a cardboard "spool" from Christmas ribbon with the "flanges" cut off. If the tube you use to give your tank shape has a wider diameter than mine, you will need to increase the base sizes, the lateral measurements of the walls, and the diameter of the roof piece to match.
 If your tube has open ends, you should cut out pieces like the one shown to the right and glue them in place now, so later on you have a surface to use when you glue the tank to other pieces. If your tube has open ends, you should cut out pieces like the one shown to the right and glue them in place now, so later on you have a surface to use when you glue the tank to other pieces.
Building the Bases
Unlike most of our related projects, this project has two bases. I cut six 2 7/8" squares and glued them together in two sets of three pieces, then let them dry overnight with something heavy on top to keep them flat. When they were thoroughly dry, I trimmed the edges smooth.
Alternatively, if you have fine corrugated cardboard (like that the kind that comes from Express Mail boxes), you could use four squares, glued together in sets of two, and wrap them like we do in our Building Glitterhouse Bases article.
Building the Water Tower
 For sanity's sake, you make certain that all of your measurements are good before you glue the patterned paper on. For sanity's sake, you make certain that all of your measurements are good before you glue the patterned paper on.
- Transfer the patterns to cardboard, making any adjustments you have to make because of tank size differences.
- Score the fold lines of the "stone" walls, then cut out that piece and fold on score lines.
- Assemble and glue the "cube" that will represent the stone base.
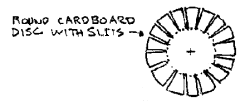
- Glue the roof together, using a clothespin or paper clip to hold it in shape until the glue is dry.
- Glue the door together, if applicable.
Note: If you are using a glued-on door and window, be sure to leave the white strip at the top and one side of the graphic - it will help provide a three-dimensional appearance when it is glued to the background. 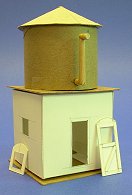
- To make the water spout, cut up and reglue the old paintbrush as shown in the plans.
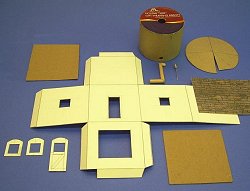
The photo at the right shows the major components stacked together to check for overall "look" before going any further.
- Using black acrylic paint, paint the window and door frames and any exposed edges of cardboard that will not be covered when the printed siding are applied. This includes the underside of the roof piece where it will jut out over the tank edge.
- Paint the water spout the color you chose (usually black or dark brown).
 As the photo to the right shows, you can use strips of cardboard to give the roof some "ribs." When the glue is dry, paint the roof your color of choice. As the photo to the right shows, you can use strips of cardboard to give the roof some "ribs." When the glue is dry, paint the roof your color of choice.
- Paint the bases your color(s) of choice - obviously, you only really need to paint the outside 1/2" or so and the outside edge.
- Apply the printed graphics to the tank and "stone walls." Do a section at a time. Measure carefully, make crisp folds, apply glue and press in place. You're better off leaving the graphic paper a tad long than a tad short.
- Trim the edges of the graphic paper, if necessary.
 Paint the door and windows. While they are drying, glue the "glazing" (yellow paper or whatever you choose) into place. Paint the door and windows. While they are drying, glue the "glazing" (yellow paper or whatever you choose) into place.
- Apply the horizontal "bands" that hold the tank together. You may use brown florist wire or small strips of dark brown paper.
- Glue the structure together. The photo to the right shows the finished structure before any frost is applied. For the "bands" that hold the tank together, you can use brown florist wire or small dark brown strips of paper.
- When all of the the glue is dry, examine the structure thoroughly. You may see white edges of the paper that the graphics are printed on when you cut pieces to fit various surfaces. With a felt-tip pen, marker, or acrylic paint and a very tiny brush, carefully coat just the edge of paper and touch up the edge of cardboard if needed.
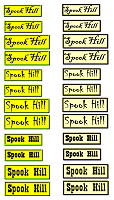 If you wish, you may print the Spook Hill signage, cut out some signs you like, glue them to card stock, cut out the card stock, touch up the edges with a black marker, and glue them to the tank. (Sorry I don't have any signage for the tinplate version yet. Paul says he'll take requests, though.) If you wish, you may print the Spook Hill signage, cut out some signs you like, glue them to card stock, cut out the card stock, touch up the edges with a black marker, and glue them to the tank. (Sorry I don't have any signage for the tinplate version yet. Paul says he'll take requests, though.)
Finishing Details
- Apply several light coats of clear satin spray on entire project to protect the printed graphics and painted trim.
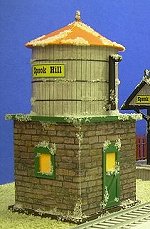 If desired, when all the glue and satin spray has dried, use clear glitter sprinkled over Elmer’s Glue-All to add little touches of frost. If desired, when all the glue and satin spray has dried, use clear glitter sprinkled over Elmer’s Glue-All to add little touches of frost.
Conclusion
Paul speaking here: When Howard was done taking photos for this year's Spook Hill projects, he sent me the station and water tower he had built while creating this project. Due to Howard's careful craftsmanship, this fun project has produced what could easily become a family heirloom. Once again, I am glad to be able to help Howard bring his project ideas to our readers.
I also can't help thinking how many different ways these projects could be useful. For example:
- You could use different colors of celophane and trim to create a railroad setting for Christmas or any other season.
- With a little redesign, you could use these projects as the basis for a realistic country station on a "serious" O-scale model railroad.
Howard has often been "commissioned" to design and or build vintage-style cardboard houses for collectors and fans of this delightful, but usually underrated art form. That's why he started his own web site, LittleGlitterHouses.com. If you would like to ask Howard to bid on a project for you, or if you have any questions for Howard, stop by there and you'll find direct contact information. If you have any questions for Paul, use this link.
Finally, if you have a similar project you'd like to share with your fellow readers and hobbyists, let us know. We'd love to add it to one or both of our sites, and we'll be sure to give you full credit for your contribution.
Other articles about Halloween houses, villages, and trains include:
Other articles about cardboard houses include:
|


|