|
|
Note from Editor: Project designer Howard Lamey has made whole villages of vintage-style cardboard structures. This project is one result of me sending him a "care package" with many printed sheets from the Resources page. I sent him several sheets of the same log cabin photo with the idea that he might want to make a three-dimensional model from them. This is what he sent me.
Easy Log Cabin Flat
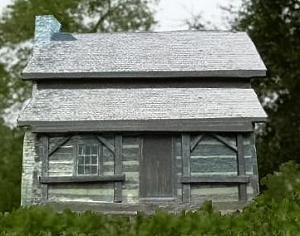 This is an easy project that doesn't require much in the way of talent or fine measurements. It uses Paul Race's Log Cabin graphic, which is available in sizes suitable for Christmas villages or O scale/On30 railroads from Big Indoor Trains' Building Front Photos page. (For bigger sizes, go to the Family Garden Trains' Building Front Photos page.) This is an easy project that doesn't require much in the way of talent or fine measurements. It uses Paul Race's Log Cabin graphic, which is available in sizes suitable for Christmas villages or O scale/On30 railroads from Big Indoor Trains' Building Front Photos page. (For bigger sizes, go to the Family Garden Trains' Building Front Photos page.)
This is a “layered” glue up project. The “layers” add just enough depth and show actual shadows. When viewed from straight on, or just to one side, it looks much deeper than 1/4-inch.
All pieces for the cabin flat are cut from graphics which have been mounted on cardboard
Making the Pieces
- Print three color copies of the log cabin page you choose.
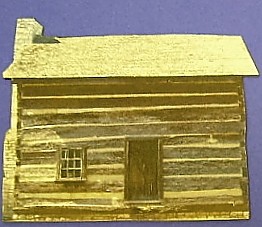 Glue each copy carefully to a relatively thick piece of cardboard, such as the cardboard from the back of a legal pad. Glue each copy carefully to a relatively thick piece of cardboard, such as the cardboard from the back of a legal pad.
- Cut out the whole cabin profile from one page.

- Cut out roof and chimney profile from another
 Cut out another roof profile without the chimney. This will be the porch roof. Cut out another roof profile without the chimney. This will be the porch roof.
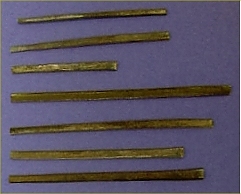
- From the "logs" on a scrap page, cut additional strips for the porch columns, braces and porch rails
 Cut an additional strip of cardboard from the lower section of the other scrap page for the foundation and porch floor. Cut an additional strip of cardboard from the lower section of the other scrap page for the foundation and porch floor.
 Cut two extra strips of cardboard the length of the lower edge of the roof pieces. Cut two extra strips of cardboard the length of the lower edge of the roof pieces.
- Before you start gluing things together, paint the edges of all pieces with an appropriate color flat acrylic paint to cover the white line that shows when graphics are cut.
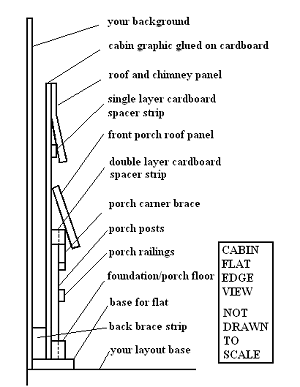 Assemble Assemble
- Glue one of the extra strips of cardboard at the bottom edge of roof line to provide the base for the roof.
- Glue the other extra strip of cardboard above the door to provide the base for the porch roof.
- Glue the strip that represents the foundation and porch to the lower edge of the cabin profile.
- Glue the strips that represent the porch columns, braces and railings to the cabin profile.
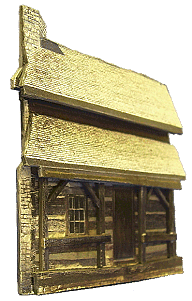 Glue the "cut-out" of the roof and chimney over the roof and chimney on the cabin profile. Glue the "cut-out" of the roof and chimney over the roof and chimney on the cabin profile.
- Glue the roof piece without the chimney so that its lower edge lines up with the strip of cardboard above the door - this becomes the porch roof.
Finish
Make a simple cardboard base with strip of wood as a back brace.
Spray the entire cabin flat with several light coats of a clear satin indoor/outdoor acrylic finish. This protects it somewhat from moisture and dust and also helps reduce fading.
Conclusion
Several other downloadable, cleaned-up building photos are available in two size ranges for you to use for similar projects:
 Sizes suitable for Christmas villages or O gauge, S scale, or On30 railroads are available from Big Indoor Trains' Building Front Photos page. Sizes suitable for Christmas villages or O gauge, S scale, or On30 railroads are available from Big Indoor Trains' Building Front Photos page.
- Sizes suitable for Large Scale trains (including 1:32 and larger scales up to 1:20.3 for some small buildings) are available from Family Garden Trains' Building Front Photos page.
Return to Howard's How-To's
|


|
Note: LittleGlitterHouses.com(tm), Spook Hill(tm), and Sandy Shores(tm) are trademarks of Howard Lamey. Big Indoor Trains(tm), Big Train Store(tm), Family Garden Trains(tm), Big Christmas Trains(tm), Garden Train Store(tm), and Trains and Towns(tm) are trademarks of Breakthrough Communications (www.btcomm.com). . Reuse or republication without prior written permission is specifically
forbidden.
For more information, contact
us.



 Glue each copy carefully to a relatively thick piece of cardboard, such as the cardboard from the back of a legal pad.

 Cut out another roof profile without the chimney. This will be the porch roof.

 Cut an additional strip of cardboard from the lower section of the other scrap page for the foundation and porch floor.
 Cut two extra strips of cardboard the length of the lower edge of the roof pieces.

 Sizes suitable for Christmas villages or O gauge, S scale, or On30 railroads are available from Big Indoor Trains'


